About

This is default featured slide 1 title

Go to Blogger edit html and find these sentences.Now replace these sentences with your own descriptions.

This is default featured slide 2 title

Go to Blogger edit html and find these sentences.Now replace these sentences with your own descriptions.

This is default featured slide 3 title

Go to Blogger edit html and find these sentences.Now replace these sentences with your own descriptions.

This is default featured slide 4 title

Go to Blogger edit html and find these sentences.Now replace these sentences with your own descriptions.

This is default featured slide 5 title

Go to Blogger edit html and find these sentences.Now replace these sentences with your own descriptions.

Showing posts with label blog trick. Show all posts

Thursday, 22 August 2013

How To Change Older Post-Newer Post With Image In Blogger/Blog


Replace The Older Post And Newer Post And Home Link With Image in my Blogger/Blog.

Friends do you want change older post newer post and Home link text with cool pictures like right arrow left arrow or Home Icon and with your favorite text.

Follow My Steps :
  • Login to your Blogger Account.
  • Select the Blog.
  • Click Template (See Demo Image)
  • Now (Press Ctrl+F) serach for the below highlights codes in your template.
expr:title='data:newerPageTitle'><data:newerPageTitle/></a>
expr:title='data:olderPageTitle'><data:olderPageTitle/></a>
expr:href='data:blog.homepageUrl'><data:homeMsg/></a>


For Change Older Post :
Replace <data:newerPageTitle/> with below Code.

<img alt='Previous Page' src='https://blogger.googleusercontent.com/img/b/R29vZ2xl/AVvXsEi_p02Rg7U1kUhgTZIQyEs4zyflJoSEiEUlRDVaqnPftHqHJ6StOtfBvBkRTyjEIyrdoEMUh6DpF_nghbHZI9pcQa-4e0TKY9fTuGTK1YHGNl-9kr5gurloVBuTge-C_4R9E2Ashju6qhg/s96/Previous+page+button.png'/>


For Change Newer Post :
Replace <data:olderPageTitle/> with below Code.

<img alt='Next Page' src='https://blogger.googleusercontent.com/img/b/R29vZ2xl/AVvXsEhaCGZ_kkP6elbFvX6XWhkVIqET3h5gUE2IfsfrGBOa6Wf1aCd2WbaCwSC9rFsjXuXVW4q5vpWqHZZBJSfui53pss4Q5P-C386Dg-R1wYM-XSUulkScoM66JoboBW1pgTTb6B0m6eBigN0/s96/next+page+button.png'/>

For Change Home Text :
Replace <data:homeMsg/> with below Code.

<img alt='Home' src='https://blogger.googleusercontent.com/img/b/R29vZ2xl/AVvXsEjHuy7Ox7OA5xMZ2lk6ERxUdROA1V8qHGXfN7qkB_LMWNfrQw6YqpxqxOcMaLaJMoR7aurHMkaEB2aKNA1O7TJeNsMAVid5ny58zkCjeLLEbXSOG08LnTg6Sd9xsRPWxlk7YIMKHjh8vmI/s50/Home+Button.png'/>

  • Now After all change Save your Template (See Below Demo Image)
  • Now your blog is ready for new style now it will look like below image how to change older post and newer post or Home link with image in blogger/blog
  • Before And After Change Deference.(See Below Demo Image)
Note : You Can Try your favorite image for older post,newer post or Home link Just below Code.
<img src='your Image URL'/>
Your Image URL Replace with your Favorite image Url Address.

How To Redirect Blog To Another Blog/Website-Redirect Blog =

=
Redirect Blog to another web page some time we need our blog forward to another web address it's a very easy to redirect blog to another blog or web address below simple step is given just follow them and your blog wull be redirect.
  • Step 1 : Sign in Your Blogger Account
Note : If you are using old blogger interface Upgrade it to new interface.(On the top is upgrade option See Demo Image)
  • Step 2 : Select Your Blog
  • Step 3 : Now Select Template Option (See Demo Image)
  • Step 4 : Click Edit HTML Option
  • Step 5 : Press CTRL + F for find box now find <head> (it's near the starting code)
  • Now After <head> Past Below Code 
   <meta content='5;url=http://www.YOUR-URL.com/' http-equiv='refresh'/>


Note : Replace http://www.YOUR-URL.com with your website URL where you want to redirect your blog.(See Demo Image for Ex-we replace with our site URL).

  • Final Step : Save Your Template.You Have Done it now your blog is ready for redirect to another url.

How To Blogger Custom Post Url By Using Permalinks-Blogger Tips


Blogger New Features-Hello Friends Blogger is present new features for blog publisher it,s name Permalink.

This Feature use for post custom Url and it,s great for our blog for publish post by using custom URL.It's also help full for our SEO (Search Engine Optimization).
Now I'am going to tell you use of this feature.

Suppose you are creating a post about the notebook and you want "My first notebook" title and you want small or long URL or as you want Se Below Example.

Without use permalinks features by default below URL will be generated.By using your post title.

yourblog.blogspot.com/2012/08/my-first-notebook.html

By using permalinks feature you can create custom URL as below.

Yourblog.blogspot.com/2012/08/m-f-n.html
OR
Yourblog.blogspot.com/2012/08/this-is-all-about-my-first-notebook.html
OR
Yourblog.blogspot.com/2012/08/your-custom-text.html

/2012/08 this is year and month when you publish post you can't change this it's by default part of URL address.

I hope now you can understand use of permalinks feature.Now you can create your custom URL as you want for SEO use.

How To Use Permalinks Feature?

Friends in above article you have understand use of this feature I hope now you want to know how to use this feature.Now I am going to tell you how to use of this feature follow below steps for use this.

1. If you are using old blogger interface upgrade this is new interface by pressing upgrade now button in top of your blogger Dashboard.Because all new feature available in new blogger interface.

2. Now create your post and before publish click permalinks option.(See Below Demo Image)
 
3. Now custom your url and publish your post.

How To Verify Your Website And Add Sitmap To Google-Fast Traffic


In earlier posts I posted tips on How to submit your website sitmap to Google Webmaster Tools.Today in this post i am going to show you how submit blogger sitmap to Webmaster Tool.Sitemap basically show Google search bots you recent activity quicker and without the bell and whistle than can cause crawl errors.Submitting Sitmap to Google is the best way to increase traffic.Submitting a sitmap mean to send request to serach engine for the indexation of your blog all post and page in serach engine in order to increase the traffic of your blog.The first sitmap only contains 26 most recent posts ! If you have more than 26 posts they are not indexed.You Should still add both sitmaps.the more the better.There are two main steps to submit sitmap.First is verify your blog on Google Webmaster Tools and second is submitting the sitmap.So friends what are you waiting for,lets start it.
Step 1.Verify Your Blog In Webmaster Tools.

Go To Webmaster Tools and Sign in with your Google Account.After signing in,you will be  on Homepage and there you will see all the blogs of you.If you are using blogger then all the blog will be automatically added to Google webmaster tools because blogger belongs to Google.So,To verify your blog click on 'Manage Site' drop down menu in the reight side of your webmaster dashboard and go to "Verify this Site" (See Below demo Image).
 
2. Next Click on alternative method.(See Below Demo image)
 3. Click on Edit HTML TAG circle See Below Demo Image you will see HTML META TAG for verifcation your website or blog.
 

4. Copy the Meta Tag (for example,<meta name="google-site-verification" content="z5mJLjVGtEe5qzCefW1pamxI7H46u19n4XnxEzgl1AU" />) from the Instructions box

5. In a new browser window or tab,navigate to the Google Site you wish to verify.(You will need to go back to the Webmaster Tool page,so do not close it.

6. Paste Meta Tag after opening "<head>" Section.
7. Click "Save Changes."
8. Go back to the Webmaster Tool page where you copied the meta tag.
9. Click "Verify" and your're done.
Step 2. Submit Your Sitmap To Google Webmaster Tools.

1. Click on Optimization at the left side and Then Click Sitmap.


2. Next Click on Sitmaps and Add/TextSitmap


3. In the blank  from paste sitemap "atom.xml?redirect=false&start-index=1&max-results=500 "  and then click "Submit Sitemap" Reapeat this step for remaining sitemaps until you have finished submitting all the sitmaps that you generate.
Now Google will take only three days to crawl and index every single page of your blog.and after 1-3 days your indexed Url look like this.(See Below Demo Image)
You have submitted successfully your sitmap to google and if you are still unable to submit your sitmaps.
Do You Like This Article Plz Comments And Share With your Friends
You have submitted successfully your sitmap to google and if you are still unable to submit your sitmaps.
Do You Like This Article Plz Comments And Share With your Friends
You have submitted successfully your sitmap to google and if you are still unable to submit your sitmaps.
Do You Like This Article Plz Comments And Share With your Friends
You have submitted successfully your sitmap to google and if you are still unable to submit your sitmaps.
Do You Like This Article Plz Comments And Share With your Friends

How To Add Meta Description To Blog Homage & Blog Post in Blogger


Meta descriptions for the web pages can improve the chances of your site being found and clicked on.In Short Meta description tags are very important to optimize your blog in search results.You can finally add meta description to individual post and pages on Blogger! This new feature is only one of several new features added by Blogger aiming at improving its Seo (Search Engine Optimization).With new Blogger interface we can add a meta description tag to Blogger blog without editing template's HTML.But you can not add meta keyword to your blog using Blogger Setting.(Meta Description,which are HTML attributes that provide concise explanations of the contents of webpages,are commonly used by search engines on search results page to display preview snippets for a given page.(from http://gujjarfaisal786.blogspot.com/).A good description increase the post,s chance of getting click.So Let's start the tutorial.
How To Enable And Add Meta Description :
Blog Meta Description - This is a description of your entire blog.You use this to describe your entire blog to search engine.
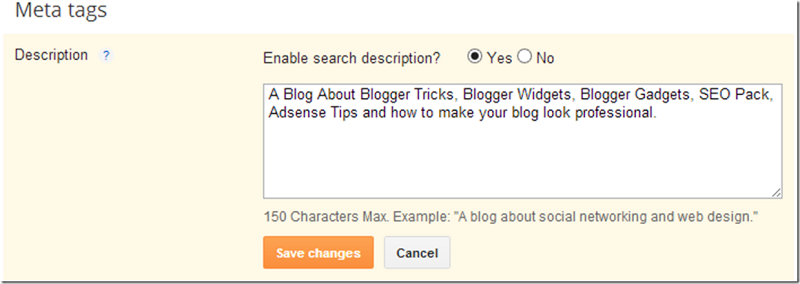
1. Go To Blogger Dashboard >>Setting>>Search Preferances>Meta tags>Description and Click Edit Link.(See Below Demo Image)
2. Enter the Meta Description for your blog.This meta description will appear on your homepage and other multi-post pages.
3. Click Save Changes Button.
Adding Meta Description To Individual Pages :
Post Meta Description - This is a description added to every individual post on your blog.You use this to tell search engine what each post is about.
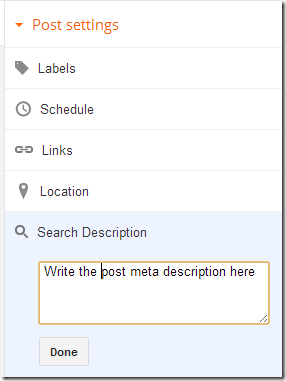
1. In your post editor see right side panel under Post Setting click search description option.(This option appear only after the enable search description step 1).
 
2. Enter the Meta Description for the Post and Click Done.
For older post,you have to go back to edit each post and manually add in the description.
How To Verify Your Meta Description :
You can Verify your meta description by using this free meta tag checker tools.
More Troubleshooting :
If none of the meta description appear,chance are your template does not contain the necessary code to important the meta description from Blogger database.

1. Go To Blogger Dashboard>>Tamplate>>Edit HTML and Find the following code.
<b:skin><![CDATA[

2. And Paste the Following Code before/above  <b:skin><![CDATA[

<b:if cond='data:blog.metaDescription != &quot;&quot;'>
  <meta expr:content='data:blog.metaDescription' name='description'/>
</b:if> 
 
 3. And Verify Again.I just hope this tutorial would be helpfull for all of you.the step are extremly simple and easy.Wich you all the best with your blogging endevors.Happy blogging.If You Face any problem and trouble plz comments in below post.Share With Your Friends Thsi Post.

How To Remove Subscribe To:Post Atom Link in Blogger/Blog


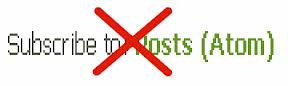
In this post I am going to show you how you can remove the subcribe to post atom from your blogger/blog.Which you can see below your comments from.This link is always irritating me for showing my blog professional.
I was just wondering if there is a code on how to remove the feed link at the bottom of a post,the one which say Post (Atom).Without affecting anything.
And finally I found this piece of code and remove it from my template I want share this tip on my blog if any hate this link this help us to remove this link from blog.You can remove just in Two Steps it's very easy.Let see the tricks below. 


1:-) Go to your Blogger Dashboard>Template>Click on Proceeds Button>Click Expand Widget Box.

2:-) Press CTRL + F and Find this lines in your template.How To Find Code in Template

<b:if cond='data:blog.pageType != "item"'> <!-- Blog feed links -->
<b:if cond='data:feedLinks'>
<div class='blog-feeds'>
<b:include data='feedLinks' name='feedLinksBody'/> </div>
</b:if>

3:-) Remove the highlighted code which I showing you above and press Save Button.